

Key Takeaways
- Attics are typically the highest-priority insulation upgrade in older homes due to direct heat rise.
- Air sealing and insulation work together — doing one without the other limits results.
- A DIY walkthrough can identify the worst offenders before you spend money on contractors.
- Walls in pre-1980s homes are often uninsulated cavities that require professional retrofitting.
- Permits may be required for certain insulation work, especially spray foam in enclosed spaces.
Why Older Homes Lose So Much Heat
Homes built before the 1980s were constructed under building codes that placed little emphasis on thermal performance. Insulation standards were minimal or absent, and the concept of a continuous air barrier — a sealed envelope keeping conditioned air inside — was not yet standard practice. As a result, many older homes are effectively sieves: warm air bleeds out constantly, and cold air infiltrates from dozens of entry points.
This isn't just uncomfortable. It means your heating system works harder and longer to maintain the same temperature, which shows up directly in your energy bills. If you've noticed persistent cold spots, drafts near baseboards, or unusually high heating costs despite turning down the thermostat, heat loss through the building envelope is a likely culprit. Our related guide on why energy bills stay high even after cutting back explores how these hidden inefficiencies compound one another.
The good news: heat escapes through predictable pathways, and addressing even the most significant ones can make a measurable difference in comfort and energy use.
The Six Major Heat-Loss Pathways
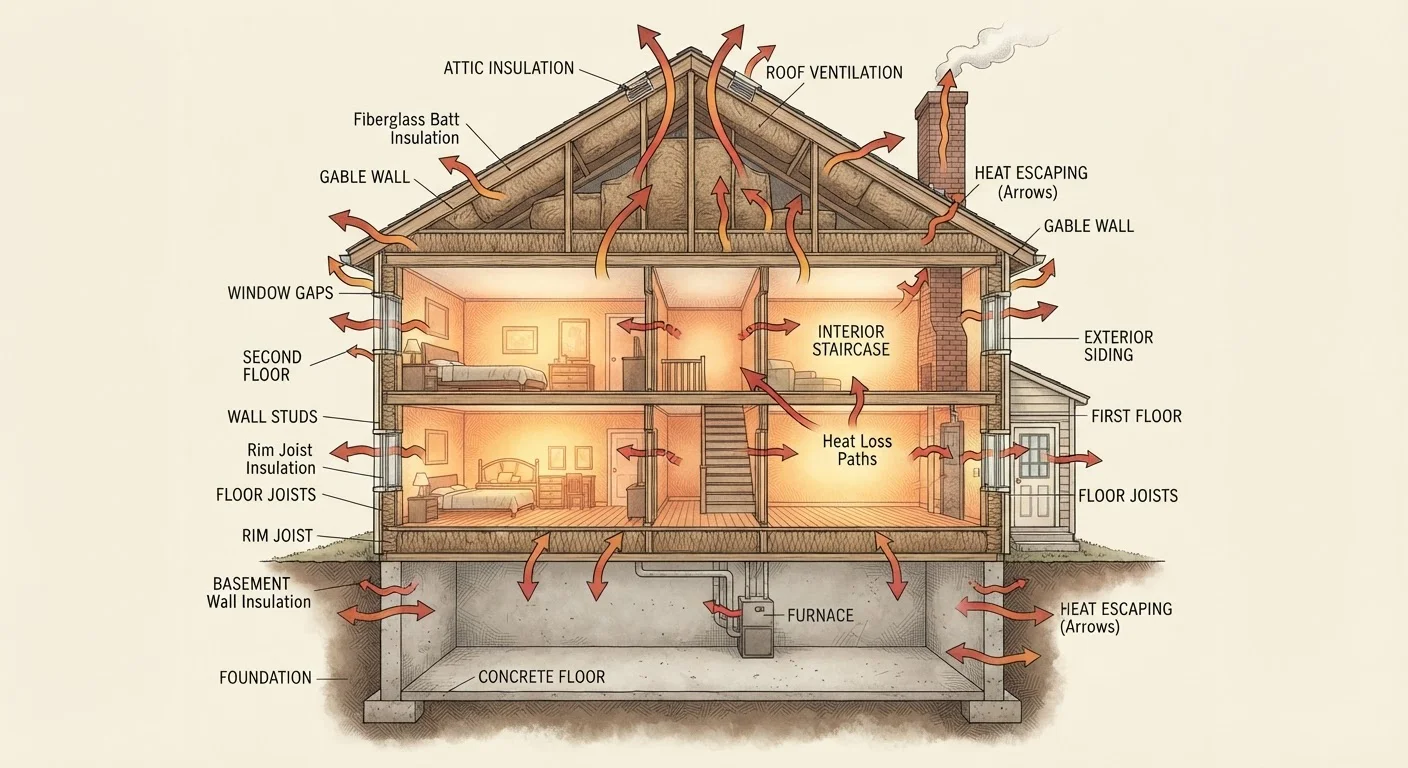
Understanding where heat goes is the foundation of any insulation plan. Physics is consistent: warm air rises, seeks gaps, and transfers through any surface with low resistance. In older homes, the following locations account for the majority of losses.
~25–35%
Heat lost through the roof in a typical uninsulated older home
According to the US Department of Energy, the attic is one of the single largest sources of heat loss in residential buildings.
R-38 to R-60
Recommended attic insulation R-value for most US climate zones
The DOE's insulation recommendations vary by climate zone; many older homes fall well below these targets.
15–20%
Of heating energy lost through air leakage in older homes
The EPA estimates that air sealing combined with insulation upgrades can significantly reduce heating and cooling costs.
1. The Attic Floor
Heat rises. Without adequate insulation at the attic floor (or roof line in finished attics), warm interior air moves directly into the unconditioned attic space and dissipates through the roof. Most building scientists consider this the single highest-return insulation investment in older homes. The US Department of Energy recommends R-38 to R-60 for attics in most climate zones — many older homes have R-11 or less.
2. Exterior Walls
Pre-1980s homes commonly have 2×4 stud walls with no insulation in the cavities whatsoever, or degraded fibreglass batts that have settled or become moisture-damaged. Insulating existing walls without opening them up requires blown-in techniques (loose-fill cellulose or fibreglass) drilled through small holes — work that typically requires a professional installer.
3. Rim Joists and Band Joists
The rim joist is the framing member that sits atop your foundation wall and closes off the floor framing. It's often left completely uninsulated and exposed to outdoor temperatures. In cold climates, this is a significant heat sink and a common source of cold floors on the first level.
4. Basement Walls and Crawlspaces
An uninsulated basement or vented crawlspace allows cold to migrate upward into living areas. Insulating basement walls or encapsulating a crawlspace can also address moisture issues that degrade other insulation over time.
5. Windows and Doors (Framing and Gaps)
Single-pane windows and poorly fitted exterior doors are well-known culprits, but the frames around them — and the gaps where they meet the wall — are often worse offenders than the glass itself. Air infiltration around window and door rough openings is frequently overlooked.
6. Penetrations and Bypasses
Recessed light fixtures, plumbing chases, electrical outlets on exterior walls, and ductwork penetrations all create pathways for air and heat to bypass insulation entirely. These bypasses are invisible but collectively significant. Insulation and draught-proofing address different parts of this problem — both are usually needed.
How to Diagnose Your Home Before You Spend Anything
A structured walkthrough costs nothing and can tell you a great deal. On a cold day with the heating running, move through the house systematically and note the following:
- Hold your hand near baseboards, electrical outlets on exterior walls, and window frames. Detectable airflow or cold surfaces indicate infiltration or missing insulation behind the wall.
- Check your attic hatch. If the hatch cover has no insulation on top and sits loosely in its frame, it's a direct aperture for heat loss.
- Look at the attic floor. If you can see the tops of floor joists with minimal or compressed insulation between them, you're well below recommended levels.
- Inspect the basement rim joist area. Bare wood framing against the foundation with no foam or batt insulation is a clear gap to address.
- Note cold floors on the first level. This often points to an uninsulated crawlspace or basement ceiling rather than a problem with the floor itself.
A professional energy audit using a blower-door test and infrared camera provides a much more precise picture — the camera reveals temperature differentials invisible to the naked eye. Many utility providers offer subsidised or free audits; it's worth checking whether yours does. Our room-by-room efficiency audit checklist provides a broader framework for this kind of systematic assessment.
Where to Start: A Prioritised Upgrade Sequence
With limited budget and time, sequence matters. Generally, work from the top down and seal before you insulate — adding insulation over significant air leaks is far less effective than addressing both together.
Step 1: Air Seal the Attic Bypasses
Before adding insulation to an accessible attic floor, seal penetrations with fire-rated caulk or expanding foam. This includes gaps around recessed lights (use airtight covers rated for insulation contact), plumbing vents, wiring runs, and the tops of interior partition walls, which often communicate directly with the attic.
Before adding any attic insulation, spend time sealing bypasses first — even a small gap around a plumbing chase can transfer more heat than a large area of low-insulation attic floor.
Air movement carries heat far more efficiently than conduction through solid materials; an unsealed penetration can negate significant insulation added nearby.
When insulating rim joists, cut rigid foam boards slightly oversized so they compress slightly into the joist bay — a friction fit combined with foam sealant at the edges is more effective than relying on adhesive alone.
A continuous, gap-free seal at the rim joist is what delivers thermal performance; loose-fitting boards with partial adhesion leave thermal bridges around the perimeter.
Step 2: Increase Attic Insulation
After sealing, add blown-in cellulose or fibreglass to bring attic insulation up to the R-value recommended for your climate zone. Blown-in material conforms to irregular joist spacing and existing obstacles more effectively than batts. This is a DIY-feasible project for accessible, unconditioned attics with proper protective equipment.
Step 3: Insulate and Seal Rim Joists
Cut rigid foam board to fit snugly between each joist bay at the rim, then seal the perimeter with spray foam. This is one of the most cost-effective improvements available in cold climates and is manageable as a DIY project in accessible basements.
Step 4: Address the Basement or Crawlspace
Insulating basement walls (interior side) or fully encapsulating a crawlspace addresses moisture and thermal performance simultaneously. Crawlspace encapsulation in particular is a complex project — evaluate whether professional involvement is warranted for your situation.
Step 5: Walls and Windows
Exterior wall insulation retrofits are typically the most expensive and disruptive interventions, which is why they appear later in the sequence — earlier steps often yield more return per dollar invested. Window replacement may be warranted when frames are failing or units are single-pane, but upgrading to double-pane low-e glass without addressing air sealing around the frame can still leave significant heat loss in place. For heating system trade-offs, see our guide on zoned vs. whole-home heating for context on how a better-insulated envelope changes what heating approach makes sense.
When to Call a Professional
Several insulation tasks genuinely require licensed contractors — either for safety, regulatory, or technical reasons:
- Spray polyurethane foam (SPF) in enclosed spaces: Requires respiratory protection, specialised equipment, and proper cure time. Many jurisdictions require permits for closed-cavity applications.
- Blown-in insulation for existing wall cavities: Drilling through exterior cladding or interior plaster and patching it afterward requires skill and the right equipment to avoid damage.
- Any work near knob-and-tube wiring: Many older homes still contain knob-and-tube wiring, which cannot be covered with insulation without first being evaluated and potentially replaced by a licensed electrician. This is a safety-critical issue — consult a qualified electrician before insulating around any suspected knob-and-tube circuits.
- Permits and inspections: Depending on your municipality, insulation work in certain locations (especially attics and basements) may require a permit. Always verify local requirements before starting.
For a seasonal view of when to schedule these upgrades, our seasonal home efficiency checklist can help you time projects before heating season begins. A well-insulated home also creates the conditions for natural ventilation strategies to be genuinely effective in warmer months.
This article is for general informational and educational purposes only. Building codes, permit requirements, and safe practices vary by location. Always consult a licensed contractor or building professional before undertaking structural or insulation work, particularly where electrical systems, gas lines, or regulated trades are involved.